Chemistry → Winning
Dense chemistry wins tournaments, and it doesn't look the same for every team. Argentina won with a nucleus. France ran a network. Morocco built a wall. Croatia powered an engine. AW-JOI and AW-JDI see all four shapes. Event-only frameworks see none of the off-ball mechanics that distinguish them.
What is chemistry? An unspoken connection between players: the shared movement and timing that grows out of playing together. Practice, experience, and the non-verbal communication that lets two teammates know what the other will do before they do it.
You can't put a number on "unspoken" directly, so we measure its fingerprint, in three steps:
- We quantify it with AW-JOI: how strongly the model’s attention links two teammates off the ball, weighted by the danger they create together. The strongest pairs in the tournament: Mbappé & Theo Hernandez, Hakimi & Ziyech, Messi & de Paul.
- Strong pairs combine more. They work more combinations near goal (give-and-gos, third-man runs, take-overs), and that, more than raw talent, is what creates extra good chances (xG). Where it comes from: how long the players have been club teammates.
- You can watch it happen in Messi’s goal vs Australia below: the chemistry signal lighting up off the ball, frame by frame, before the pass that frees him.
The three combinations we count, quick exchanges near goal that only click when players know each other:
These happen ~49× a game. Here's how often each was part of a move that scored within 10 seconds across World Cup 2022, a kind of shooting percentage. They make the chances; finishing them is rare. (That's why we score them against xG, not goals.)
How we detect these: the exact rules (no labels, just tracking)
We read the ball-carrier every frame (the player with possession) and match three structural patterns in the final third. No hand-labels, no model, just the ball's path:
- Give-and-go (1-2): the ball goes A → B → back to A, with B’s touch brief and each pass within ~3 s. It returns to the player who started it after one quick intermediate touch.
- Third-man: A → B → C → back to A. It returns to the starter via a two-touch relay (brief touches, within ~6 s).
- Take-over: two teammates run toward each other within ~4 m and the ball transfers between them over <5 m. A hand-off, not a pass.
- A brief opponent touch (≤0.6 s) the team instantly re-wins doesn’t break a move.
The limit to keep in mind. This is a structural detector: it reads the ball’s movement, with no judgement of intent. It reliably finds the pattern (the ball returning to a recent teammate), which usually matches the eye-test 1-2 or relay, but it will sometimes flag a return a coach wouldn’t call a clean give-and-go (e.g. a wide switch that happens to come back). It’s a count of a repeatable structural signature, not a coach’s tag, which is why we publish the rule.
Chemistry density vs WC22 finish
Team Chemistry Density (TCD) is the count of same-squad pairs with attention-weighted JOI per 90 above the threshold: the number of dense, repeatable connections inside the team. The leaderboards are on Chemistry Leaderboard; the regression test is here.
Does chemistry actually help? We tested it against expected goals.
Expected goals (xG) measure the quality of a team's chances, the modern way to judge attack and defense beyond the final score. We checked whether teams with better player chemistry create more good chances, and allow fewer, than their talent alone would predict. Each point is a World Cup 2022 team. On the defending chart we strip out talent, schedule, and how far each team advanced, so what's left is chemistry's own fingerprint (further right = more chemistry than star power explains; higher = fewer chances allowed than expected). On the attacking chart we sort teams into groups by talent (or by how long they've played together) and ask a simpler question: inside each group, do the teams that combine more (quick give-and-gos, third-man moves and take-overs near goal) create more good chances? Gold = the four semifinalists.
How we control for talent (and what "caps" means)
Better teams tend to do everything more, so a raw correlation can just be "good teams do good
things." To separate chemistry from talent, every axis on these charts is residualized
against four squad measures: FIFA-23 Overall (ability), caps (a "cap"
is one national-team appearance, so a squad’s average caps is its international experience),
games played at the tournament, and opponent strength. We use those four to
predict what each team’s number should be, then keep only how much it beats or misses
that prediction, and correlate those leftovers ("more chemistry than talent predicts" vs
"better than talent predicts"). The scatter axes you see are those leftovers, so the trend
shown is already talent-adjusted, not the raw relationship.
It survives the adjustment: shared club history to combinations is ρ +0.41, holding at +0.43
even at equal talent; the combinations-to-xG link is +0.43 post-adjustment. Metrics that were just
talent (generic partnership strength) collapse toward zero under the same controls. Caveat: this removes the
linear talent component and is only as good as FIFA’s rating of talent (which is imperfect).
It means "survives a standard talent adjustment," not "talent is ruled out."
Yes. It holds up even after accounting for talent and schedule.
Each group is split in half: the teams that combine less (grey) vs more (gold). Bar height = the good chances they create. Gold is taller in every group, so more combinations means more chances at every level of talent. (Bar height is the team's total StatsBomb xG, all chances from any source. This is correlational: combining teams create more total xG; it is not "0.8 xG came from combinations.")
How we measured the defensive panel
Both axes are residuals after accounting for FIFA rating, caps, games played, and opponent strength (an "added-variable plot"), across 29 teams with FIFA ratings. Defensive chemistry (count of strong defensive partnerships) vs expected goals allowed: partial correlation +0.38 (90% confidence interval 0.09 to 0.60, which clears zero, so it’s a real signal). The attacking panel uses combination play, detailed in its own "how we measured this" below.
The defensive half: chemistry's stronger signal
The left-hand scatter just above already shows it: defensive chemistry is the cleaner finding. The same talent-adjusted test (FIFA + caps + games + opponent strength) gives a partial correlation of −0.38: teams with more strong defensive partnerships concede fewer chances than their talent predicts (90% CI −0.64 to −0.08, clears zero). Oriented as chances prevented that's +0.38, stronger than the +0.16 the attacking side earns. Here is the same story team by team. (Notice France: in the scatter it sits a touch above the trend line, slightly outperforming what its talent-adjusted defensive chemistry predicts, while its chances-prevented lands essentially level with expectation (−0.02). That's why France reads neutral, not red, in the table below, even though it's 3rd by raw strong-pair count: a high partnership count, an about-as-expected result.)
Strong def pairs = the count of a team's defensive partnerships whose coordination (attention-weighted JDI, the defensive twin of AW-JOI, GKs excluded) rates above the tournament median. Because it's a count, it leans toward teams that played more (corr +0.51 with games), so the Adjusted (talent+games) column strips out talent, schedule and opponents for the games-fair version. The adjustment is what reveals the finding: the raw count's link to actually preventing chances is ≈0 (games masks it), and the validated −0.38 result is built on this adjusted column. Morocco and Argentina stay top-4 adjusted; France slides (its 15 was inflated by 7 games + elite talent). xG prevented vs exp is measured StatsBomb xG-against relative to the talent baseline: ✓ clearly fewer chances allowed, ✗ clearly more, and white, no mark = about as expected (within ±0.2 xG/game; e.g. France −0.02, Argentina −0.19). Click any header to sort.
Why team-level only: we tried a per-pair defensive board too, but raw AW-JDI tracks shared minutes almost perfectly (ρ 0.97), so it surfaces attackers who simply played a lot rather than real stoppers. It fails the eye test, so we don't ship it. The count of strong partnerships per team is the part that survives the talent controls, so defense stays a team story. One exception worth naming: Croatia reached the semifinal (#12 here, −0.52 prevented) on midfield control, not a defensive wall. Chemistry rates a tendency, not a verdict.
What the model actually uses for defense
How does the model judge defending? We probed it directly: nudge one part of a frame, watch how its predicted chance of a goal moves. Two things stand out, and one of them is a surprise. First, it reads the attack more than the defense. Moving the attackers around changes its prediction about 2.7× more than moving the defenders, and it spends about 2.5× more of its attention on attacking players. So it mostly grades defending indirectly, by reading how dangerous the attack looks. Second, the one defensive thing it keys on directly is how high the back line sits. The curve below is the real measured response: drop the line about 10 m deeper and predicted danger falls roughly 2 points; push it 10 m higher and danger climbs about 1.5 points, cleanly and smoothly. A high line leaves space in behind, and the model sees it. It is not grading individual defenders; it reads overall shape and line height. That is also why defense is the cleaner team signal: line height and shape are drilled, stable things, not volatile like attacking output.
Sensitivity of the model's calibrated chance-of-a-goal to shifting the defending team's back line up or down the pitch (positive = higher up), measured on 6,000 genuinely dangerous frames across all 44 matches. Up and to the right means the model reads more danger; down and to the left, less.
How these teams actually defended
The model keys on line height and shape, so here is the shape itself, measured straight from the tracking with no model involved. These are classic position numbers any viewer can check: how high the back line sat when the opponent had the ball in its own half, how compact the block was front to back (length) and side to side (width), how often a defender actually closed down the ball (press), and how much territory the opponent was allowed (final-third entries). They describe a defensive style, not a grade. A high line is a choice, not a mistake, so there is no good or bad colour here, just where each team sat. Click any header to sort.
Press = share of out-of-possession time with a defender within 5m of the ball. Line, own half = average back-line height (4 deepest outfielders, from own goal) while pinned in the defensive half; it is compressed because when a team is truly camped back, everyone defends near their box. Length and Width are the block's front-to-back and side-to-side spread (lower = more compact). F3 entries is opponent entries into the final third per game, which is territory, not chances. Limits: samples run 1 to 7 games per team (the G column), we have 44 of the 64 matches so opponents and scorelines shape the numbers, and forced turnovers, line breaks and PPDA need event data we do not have here, so we leave them out rather than estimate them.
How their shape changes with the ball
The panel above is the block without the ball. This is the other half, and the part the defensive numbers cannot show: where the same ten outfielders sit with the ball, and how far the shape stretches between the two. Faded dots are the defending shape, solid gold dots the attacking shape, and each arrow is how that line moves when the team wins possession. Pick a team to see its two shapes, an example play, and where it sits on the whole field. The point: the model reads danger off shape, and shape is not a single number; it shifts constantly with possession.
The whole field, by how much the shape stretches
Every team we have, by their shape with the ball and the swing from defending to attacking. Widen is how much wider they get on winning it, Advance how much higher up the pitch. Semifinalists are starred and Morocco is highlighted. Click any header to sort.
Limits: these are average banded positions (a back four, a midfield, a front line), not individual tracked players, and real shapes morph constantly. Samples run 1 to 7 games per team; the four semifinalists have 6 or 7. Morocco's six games were all against strong, ball-dominant sides, so the size of its low-possession and deep-block numbers is partly opponent driven.
Morocco up close: how compact, and how deep
Two things in particular: show Morocco's length, and show where they actually were, especially when defending and how deep. Here is both, straight from the tracking with no model. The length bars read compact off the ball and stretched on it; the heat shows the block living in its own and middle thirds.
Do quick combinations actually create chances, or do good teams just combine more?
Here is the test. First we predict each team's chances (expected goals per game) from four things that have nothing to do with chemistry: talent (FIFA rating), squad experience (average caps; a cap is one national-team appearance, so it's how senior the squad is), matches played, and opponent strength. That's the fair expectation. Then we ask: do combinations explain the chances that expectation missed?
| Talent + experience + schedule + opponents | R² = 0.56 |
| + combinations (chemistry) | R² = 0.61 (5% less error) |
Controlling for all four, teams that combine more create more chances: partial correlation +0.43 (90% CI 0.09 to 0.69, clears zero). Combinations explain 18% of the chances talent alone can't.
Chemistry predicts chances beyond talent. Not who wins (that's finishing, defence and knockout luck) but who creates, over and above their stars. And it's buildable: squads whose players already played together combine more (shared club history below). The WC26 lever is who you put on the pitch together, not just who's best.
Which teams combine most
This ranks chemistry, not raw volume. Raw volume just re-finds talent (Spain, Germany, England combine most and didn't go deep), so the default view, Chemistry beyond talent, counts only genuine partnerships (pairs that combined ≥ 6 times, dropping the one-off noise) and adjusts for talent + opponents. Chemistry-added xG/g is how many chances per game those partnerships add beyond that baseline; Chances vs expected (✓ = it paid off; white, no mark = about as expected) is what the team actually created. It's a chemistry rate, not a trophy predictor: the deep teams surface (Morocco #3, Croatia #6, Argentina #7) alongside over-combiners like England and Spain, because creating chances isn't the same as winning a knockout. Flip to Who combines most for the raw volume foil. Gold ★ = semifinalist.
Genuine partnerships = pairs that combined ≥ 6 times (a true sustained duo, not a one-off). We adjust per game and for talent + opponents, so this is a chemistry rate. Chemistry-added xG/g is an estimate (the combo rate × the regression's xG-per-combo slope): a model attribution, not measured xG. Chances vs expected beside it is the measured StatsBomb xG above/below the talent baseline. A clearly negative value (red ✗) means the team created fewer chances than its talent predicted (Spain −0.56), clearly positive means more (Argentina +1.18), and white with no mark means about as expected (within ±0.2 xG/game). Click either column header to sort (sort by Chances vs expected to see who actually produced). One caveat: no team metric here can rank "the best teams". When we checked, going deep tracked games-played (ρ 0.89), not chemistry. So read this as who builds genuine partnerships beyond their talent, not who's best. The real chemistry signal lives at the player and pair level below.
The nuclei: who the combinations run through
Team totals wash out the individuals; at the player level the picture is sharp. These are the hubs every move runs through, and Messi was the #2 nucleus of the entire tournament: 54 combinations with 13 different teammates, behind only Mbappé. Sort by total, per game (Pedri's Spain combined relentlessly in just four matches), or AW-JOI (the model's read on combination threat, where Kovačić's Croatia midfield jumps out). Gold ★ = semifinalist.
Click any column header to sort. Combos (combinations with teammates, final third) and Threat+ are tournament totals; / game is per match. Partners = distinct teammates combined with (how much of a hub). AW-JOI (×10−³) = the model's attention-weighted read on the move; Threat+ = the model's scoring-probability rise during the move (ΔP-score), not StatsBomb xG. Sort by Threat+ to split ball-volume from output: Messi (54 combos, 1.12) vs Pedri (46 combos, 0.40). Both saw the ball constantly, but only Messi's combinations actually threatened. / 100 touches controls for ball-volume directly: Pedri 6.5 ≈ Messi 6.2, essentially tied, so neither is a per-touch specialist and the raw counts mostly reward whoever sees the ball most. Two model-based, games-fair cuts close the loop. Threat/combo = the model's P(score) rise per combination, quality per play, robust to games and volume (Modrić 3.0%, Mbappé 2.4%, Messi 2.1%, Pedri 0.9%). % of team = the share of the team's total combination threat that runs through this player, the nucleus or centrality cut, fully games-invariant (De Bruyne 33%, Messi 22%, Mbappé 21%). Top 50 by total (min 7 partners = genuine hubs).
Where the combinations come from: shared club history
The attacking signal runs as a chain: teams whose players were club teammates before the World Cup (Real Madrid and Atlético blocs, or the almost-entirely-domestic Saudi and Qatar squads) work more combinations near goal, and those teams create more expected goals than their talent predicts. Familiarity, not just ability. The pairs that combine most are also the model's highest-chemistry pairs: Mbappé & Theo Hernandez, Hakimi & Ziyech, Messi & de Paul. (Shared club history = the share of the squad who have a club teammate also in the squad, the same count-based measure used in FIFA Mode. No estimated minutes, just who has actually been a club teammate of whom.)
The pairs that combine most (ranked by combinations; chemistry & threat behind it)
AW-JOI (×10−³) = co-attention × threat the model put on the pair during their combinations; Threat+ = the model's scoring-probability rise (ΔP-score) those combinations added, not StatsBomb xG. Volume ranks; the columns show the chemistry and threat behind it.
Whose combinations scored (led to a goal ≤10s)
A different set from the volume list: the biggest combiners build the most chances, but the combos that actually scored are spread thin (~1 pair each). Volume makes the chances; the team converts them.
How we measured this
A combination is a quick exchange between teammates in the final third the tracking data can see structurally: a give-and-go (the ball comes straight back to the passer), a third-man run (it returns via a relay), or a take-over (a close cross-over hand-off). It uses no value signal, so it can't be circular with xG. Versus expected-goals-for, talent-adjusted (FIFA + caps + games + opponent strength): partial r +0.43 (90% CI 0.09 to 0.69, n = 29, clears zero). Model grounding: the next-receiver model predicts the next pass on a combination 76% of the time, vs 70% for passes in general and just 44% for "the nearest teammate," so the model anticipates combinations better than ordinary play, and far better than proximity. Source: a team's combination rate rises with how much its players have played together (the shared-history chart above), and that link holds even at equal talent. Familiarity, not just ability.
The original chemistry → winning evidence (TCD rankings & the tracking-beats-event test)
TCD vs tournament finish (ρ = +0.704, n = 31, p < 0.001)
Older, talent-confounded view: X = raw TCD, Y = stage reached (Group → Winner). Predictive, but talent and chemistry are entangled here; the xG panels above isolate chemistry's share. Gold ring = WC22 semifinalist.
Correlation summary: chemistry beats raw talent
Each row is a Spearman rank correlation: one number, −1 to +1, for how tightly two rankings move together. Here: does ranking high on the metric go with finishing deep? +1 = perfect match (more of it always means a deeper run), 0 = no relationship, −1 = perfectly reversed. That ρ is the correlation; the separate p-value is just the odds the pattern is a fluke given n teams (smaller = safer, not bigger effect). For a rough sense of how much it explains, square it: TCD's +0.704 gives ρ² ≈ 50% of the finish order. TCD is the strongest predictor we found.
| Hypothesis | Correlation (Spearman ρ) | p-value | n | Reading |
|---|---|---|---|---|
| TCD → tournament finish | +0.704 | < 0.001 | 31 | Top 4 by TCD = the 4 semifinalists. France #1, Brazil #2, Croatia #3, Morocco #4. |
| FIFA 23 Overall → tournament finish | +0.548 | 0.002 | 30 | EA's published talent index does predict finish, but worse than TCD. |
| Mean AW-JOI90 (all pairs) → tournament finish | +0.45 | 0.011 | 31 | Per-pair intensity matters less than network breadth. |
| Event JOI (on-ball, counted like TCD) → tournament finish | +0.01 | 0.96 | 31 | On-ball VAEP chemistry, counted the same way as TCD (strong per-90 pairs), carries no finish signal. The off-ball tracking view is where it lives. This is the tracking-vs-event result in one row. |
| Event JOI (on-ball, raw running total) → tournament finish | +0.67 | < 0.001 | 31 | Looks predictive, but only as accumulation: teams that advance play more games (minutes-together ↔ finish ρ = +0.93). Control for minutes and it collapses to +0.27. Raw totals reward survival, not chemistry, which is why TCD is a per-90 rate. |
| FIFA 23 Overall → TCD | +0.51 | 0.004 | 30 | Top-rated nations also build denser chemistry; their players concentrate at elite clubs. |
The four semifinalists were the four densest networks in the tournament, and each one looked completely different: Argentina a nucleus (TCD rank 7), France a network (rank 1), Morocco a wall (rank 4), Croatia an engine (rank 3). The developed case study, Argentina, is below. The France, Morocco and Croatia studies, plus the full play-by-play gallery, live on Interactive Plays.
Watch chemistry happen, frame by frame
Two plays close the argument: France's textbook give-and-go, then the full Argentina case study. Two specialist models run per frame (a P(score next 10s) specialist and a P(concede next 10s) specialist) together with an attention vector over the 22 players. Scrub through and watch chemistry happen: defenders pulled out of shape, off-ball runs that move the probability before any touch, attention transferring along a chain. Each clip has its own controls bar so you can compare settings side-by-side without scrolling.
Watch a give-and-go: France's clean 1-2 (vs Australia, 31')
A give-and-go (a "1-2") is the simplest combination in football: A passes to B, B first-times it straight back to A, who has run past his marker. Two players, the ball going A → B → A. Here it's Rabiot ↔ Mbappé: Rabiot slips it to Mbappé and keeps running, Mbappé flicks it back first-touch (a 0.6 s lay-off), and two seconds later France score through Giroud. The cleanest, most deliberate version of the combination idea in the whole tournament, and it comes from a finalist.
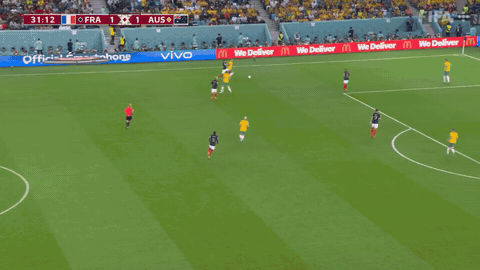
In the play below, the model's P(score) climbs through the exchange and the chemistry edge fires on the Rabiot ↔ Mbappé wall pass. This is the pure form: two players and a return pass, no third-man relay, no accident.
Why this leads: it's the textbook give-and-go. Short pass out, brief lay-off, return into space. The Messi case study below is a busier third-man variant; this is the clean pure form to learn the idea on.
Argentina: the nucleus (TCD rank 7)
Argentina look mid-pack on TCD because broad TCD undersells what one player can be. Argentina's chemistry isn't distributed across the squad; it's concentrated around Messi. Every strong pair in Argentina's network runs through him, even on possessions where he never touches the ball. The atom metaphor from the landing page visually pays off here: one central nucleus, every orbital edge connecting back to it.
Messi's orbital network
Spokes from Messi to every strong same-squad partner. Line thickness ∝ AW-JOI90; shorter orbit = stronger pair. Goalkeeper excluded so the player-to-player structure is visible. Top spokes: Acuña (0.77), Álvarez (0.74), Tagliafico (0.69), Molina (0.68), Mac Allister (0.65), Di María (0.63), Romero (0.61).
Where Messi played
The network is who he connected to. This is where he stood. Opta's open-play touch and passes-received maps put Messi in a tight high right-of-centre zone; our tracking, oriented on its own with no model, lands on the same patch.
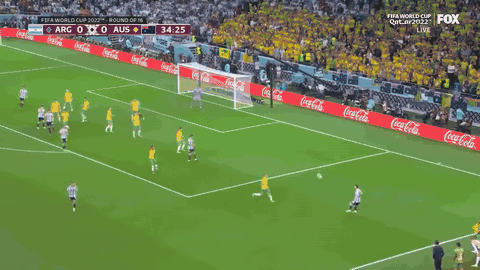
What the interactive play below shows: this goal is a combination. Messi plays it back into the recycle, it works through Mac Allister and Otamendi, and Otamendi feeds it straight back to Messi to finish: a third-man run, the ball returning to the player who started it. Watch the chemistry signal light up on exactly the two return passes that complete it, while Australia's back line never steps to Messi.
Why this clip: it's a third-man run. Messi feeds the build-up, Mac Allister and Otamendi work it, and Otamendi slips it back to Messi, who has run into the box to finish (R16 vs Australia). Watch how the model’s chemistry loads onto the combining players off the ball, then how attention collapses onto Messi at the strike.
How the AW-JOI numbers above this section are built (relationships, not outcomes)
The toggle in the chart above lets you flip between Net P, AW-JOI, and AW-JDI. Here's what's actually being summed for the AW-JOI / Event-JOI totals you see in the strip above the chart.
In plain English
For every pair of teammates (p, q), walk frame-by-frame through the clip. At each frame ask three questions:
- Is the model paying attention to both players at once? (i.e. are p and q co-loaded for the prediction at this moment?)
- Is the team's "will score in the next 10 s" probability rising right now?
- If yes to both, this pair earns a little credit for that frame, scaled by how strongly they're co-attended and how much the prediction rose.
Sum those tiny credits across every frame and you have the pair's AW-JOI for the play. Sum every pair on a team and you have the team's AW-JOI.
Why this isn't an outcome stat. The shot itself is one frame's jump. The rest of the AW-JOI comes from every other moment where two teammates were simultaneously load-bearing for the model's read while the scoring probability was climbing. So a pair that never touches the ball can still post huge AW-JOI, as long as the model keeps "looking at them" during dangerous build-ups. That's the relationships-not-outcomes part. Event data can't see it because event data only credits the player who actually touched the ball.
The formula
AW‑JOI(p, q) = Σt attn(t, p) × attn(t, q) × max( ΔPscore(t), 0 )
where attn(t, p) is the model's attention to player p at frame t (0–1, normalised across the 22 players), and ΔPscore(t) = Pscore(t+1) − Pscore(t) is the per-frame change in the in-possession team's "scores within 10 s" probability, clamped to be at least 0 (we only count rising moments for JOI).
The two pair-attention terms in the product are what makes this a joint impact rather than a per-player one. One player attended on his own isn't a pair signal; it's the simultaneous co-attendance that counts. Pairs that the model keeps co-loading during rising-threat moments are the ones whose relationship the data calls real.
The on-ball story, pass by pass
◎ Tip: these table rows double as the filter chips beside the play above; the numbers and labels match. Click a row (or a chip up top) to toggle that relationship's labels + connection on the pitch.
The pass chain that produced this goal: Messi → Mac Allister → Otamendi → Messi (finish). A third-man run: the ball worked through two teammates while the man who started it arrives to finish. For each pass we show the model's read on Argentina's 10-second scoring probability, the Chemistry on the pass partners (cumulative AW-JOI, the model's attention on the relationship, weighted by the threat it creates), and what Australia's nearest defenders are doing. Times are counted back from the goal. Probabilities are Beta-calibrated against the 8 held-out val matches. The base rate is 0.56% ("any team-in-possession scoring within 10 s"), so ~4% is ~7× the typical-frame threat level, and P(score) climbs through the build-up rather than sitting flat.
| Before goal | Pass | Pscore | Chemistry | What the defenders are doing / read |
|---|---|---|---|---|
| 10.6 s | Messi → (Souttar) | 0.1% | · | Messi's speculative early cross; Souttar clears. The model is reading Australia's back line, not the ball. It hasn't recognised a threat yet. |
| 9.4 s | Gómez recovers → Messi | 3.7% | · | Argentina win it back and P(score) jumps 0.1 → 3.7% as the 10 s lookahead sees the build-up forming. |
| 4.6 s | Messi → Mac Allister | 3.5% | · | Messi lays it back into the recycle. Still no special chemistry signal yet; CB Rowles steps up to x ≈ 40 m. |
| 2.8 s | Mac Allister → Otamendi | 4.2% | 0.090 | The relay lights up. The model has been co-loading Mac Allister ↔ Otamendi off the ball through the whole recycle; their chemistry is already at 0.090 before this pass, even though the pass itself barely moves P. |
| 1.6 s | Otamendi → Messi (feed) | 4.2% | 0.087 | The feed back to Messi, completing the third-man run. Australia's centre-backs Rowles & Souttar sit flat; nobody steps to Messi at the top of the box. P peaks ≈ 4.6% the frame before he strikes. |
| 0.0 s | Messi shot → GOAL | ≈4.6% | · | Low finish past Ryan. The threat climbed 3.7 → 4.6% across the combination rather than sitting flat. The model was getting more sure, not just staying sure. |
The headline. The 10 s-lookahead model recognises the threat early: P(score) jumps to 3.7% the moment Argentina win the ball back (~10 s before the goal). But it does not sit flat: it climbs to ≈ 4.6% as the recycle tightens and Messi peels into the box. What on-ball event data still can't see: the pair-attention on Mac Allister ↔ Otamendi (0.087, multiples of the ~0.01 background) had already accumulated to AW-JOI 0.090 before the feed ever happens. The model is "looking at" the exact pair-relationship that's about to free Messi. That's the bridge into the off-ball half of the story.
Why P(score) used to look dead-flat at 3.0%, and what we changed
Earlier versions of this page showed P(score) pinned at exactly 3.02% for the entire build-up. That was two effects stacked:
- The model is genuinely saturated. Its raw output sits at 0.90–0.94 the whole time Argentina control the ball. On a 10 s lookahead the goal is inside the window the entire build-up, so the model is correctly, confidently near-certain and barely moves frame-to-frame.
- The old calibration was a step function. We mapped raw→probability with isotonic regression, whose pooled-adjacent plateaus sent the whole raw band 0.874–0.937 to a single value (3.015%). So even the small real movement got flattened.
We swapped isotonic for Beta calibration, a smooth monotone curve, at identical val Brier (0.0055 score / 0.0023 concede). Now every raw value maps to a distinct probability, so the line climbs 3.7 → 4.6% across the recycle instead of snapping flat. The relationships (attention) were always moving underneath; the display just couldn't show the scalar moving with them.
From the conceding team's side: the model reports P(score) and P(concede) for whoever has the ball. During Argentina's attack their P(concede) is ~0 (they aren't about to concede). Australia's concede risk is the same event as Argentina scoring, so it is this 3.7→4.6% curve. It only shows up as a standalone P(concede) spike (≈ 2.8%) in the brief windows Australia has the ball. That's why we don't print a separate P(concede) column here: in an attacking possession it would just read zero.
The off-ball story: what frees the combination
The combination passes were on the ball. The clearest off-ball signal is the pairs that never touch the ball together at all, the four below. While Argentina recycled, the model kept these players linked off the ball (the centre-backs anchoring, the striker stretching the line, the full-back overlapping): the shape that freed Messi for the finish. Scrub the build-up above (the "Argentina recycle" chapter) and these exact four light up on the pitch as dashed links, their chemistry climbing. The lines match this table, row for row. The chemistry number is the model’s attention on the relationship; the attention column shows neither player is near the ball, so the credit is in the model co-loading the two of them.
| # | Pair | Chemistry | attention | Co-attended window (before goal) | What it represents |
|---|---|---|---|---|---|
| 1 | Otamendi ↔ Fernández | 0.099 | 0.03 / 0.02 | 11.8–2.0 s before goal (8 frames) | CB ↔ CM. The recycling spine while Argentina build out. |
| 2 | Otamendi ↔ Romero | 0.096 | 0.03 / 0.02 | 11.8–2.0 s before goal (8 frames) | CB pair. The back-line co-occupancy that anchors the recycle. |
| 3 | Álvarez ↔ Otamendi | 0.095 | 0.03 / 0.03 | 11.8–2.0 s before goal (9 frames) | Striker stretching the line + the centre-back feeding from behind. |
| 4 | Otamendi ↔ Acuña | 0.089 | 0.03 / 0.04 | 11.8–2.0 s before goal (8 frames) | Left-back overlapping while the ball is on Otamendi's side. |
Why the attention column matters: every value there sits below the 0.045 background, meaning the ball-token is barely watching any of these players individually. That's what the off-ball table is for: the credit isn't in either player being near the ball, it's in the model co-loading the two of them. High pair AW-JOI, low individual attention = a relationship signal, not an on-ball one.
How to read the time column: every window is counted back from the goal; the moment the ball crosses the line is the zero point. So "11.8–2.0 s before goal" means the pair was co-attended from the very start of the build-up until ~2 s before the finish, then attention collapsed onto the strike. To find any row in the play above, scrub to that many seconds before the goal frame (the ⚽ goal button jumps you there).
A footnote on "top": these four are the off-ball Otamendi pairs, co-occupancy that never shows up as a pass. By raw mass the two biggest pairs on the play are on the far side of the recycle (Gómez ↔ Acuña 0.231, de Paul ↔ Gómez 0.199), the left-side circulation that held the ball longest. We feature the central spine because it's the part that ends in Messi's goal; all numbers here are recomputed from the live clip you're scrubbing, so they match its edge chips.
How we traced each off-ball pair to a real move on the pitch
Why the model co-loads #1 (Otamendi ↔ Fernández): we traced it in the tracking.
Pair attention isn't a "who's best" score. It's the model flagging a relationship whose geometry is changing the threat. Watch this pair across its window (11.8→2.0 s before goal) and a real off-ball move falls out:
- Otamendi is the hub: he recycles the ball out to Messi, then repositions as the eventual feeder.
- Fernández peels the other way, drifting ~16 m deeper and wide (from x ≈ 45 back to x ≈ 29) away from where the goal will happen.
- That run drags a defender with him: Australia's left-back Behich stays glued ~2 m off Fernández the whole sequence and follows him clean out of the central channel.
- The shooting lane thins from 10 → 7 Australians between the recovery and the strike. Behich, Souttar and Leckie all vacate it. Messi drifts in off the right and finishes.
Caveats: Messi is still tightly marked at the strike (1.4 m), so this isn't a wide-open lane. It's a thinned one, and he finishes anyway. We can attribute Behich to Fernández cleanly; Souttar and Leckie also leave the channel but for mixed reasons (general retreat). And attention always blends genuine off-ball movement like this with the model simply reading team shape. But the headline holds: the model's top off-ball pair on this goal corresponds to a real space-creating decoy run, not an on-ball event anywhere in the data. Click the row, or scrub the window, to watch Fernández peel away and Behich chase him.
The supporting cast (#2–#4): how each one feeds what's about to happen on the ball. Same check, traced across each pair's window:
- #2 Otamendi ↔ Romero (CB pair). Romero pushes up on Messi's early cross, then drops ~10 m back (x ≈ 50 → 38) to sit alongside Otamendi as the deep recycle base. He's the safe outlet the whole build-up pivots off; the model co-loads the centre-back pair because together they're the rest-defence the attack is launched from. (Structural anchor, not a space-creator.)
- #3 Álvarez ↔ Otamendi (striker + feeder). Álvarez doesn't run in behind. He plants at the top of the box and pins Australia's centre-back Rowles, who marks him 0.8–2.5 m the entire sequence. One centre-back occupied is one fewer defender free to step to Messi; Otamendi is the deep reference Álvarez plays off.
- #4 Otamendi ↔ Acuña (left-back). Acuña holds width deep on the left (drifts to y ≈ −10), stretching the line on Otamendi's side and giving the recycle an outlet that stops Australia compressing the middle.
Put together with Fernández dragging Behich: that's a centre-back, a striker and a full-back each occupying or moving an Australian, while Otamendi recycles and repositions to feed. Four off-ball jobs thinning the central channel Messi finishes through, none of which is an on-ball event anywhere in the data. Click each row to watch its pair light up at the moment the model is co-loading them.
Common questions about the numbers above
Q1. Mac Allister → Otamendi is a completed pass toward goal. Why does it barely move P(score)?
Because the model was already reading the threat: by this pass P(score) has climbed to ~4% on the strength of the whole build-up, so one more recycle pass nudges it only a little. Event-JOI, which only credits the instantaneous on-ball change, therefore reads ~0 for this pass. But the pair Mac Allister ↔ Otamendi already carries AW-JOI 0.090, earned off-ball across the recycle. That's the distinction: the value isn't in the single completed pass, it's in the sustained co-attention that made the pass available. A truly negative pass would be a backwards recycle that relieves the threat, and nothing on this chain does that.
Q2. What does Pscore ≈ 4% actually mean? Is it calibrated?
Yes. This is a Beta-calibrated
probability, fit against the 8 held-out
validation matches. The base rate is
0.56% of frames ("team in possession
scores within next 10 s"), so ~4% means the model is
reading this state as roughly 7× the
typical-frame threat level. Earlier-draft numbers
around 92% were raw sigmoid outputs
from a class-imbalance-trained classifier
(pos_weight = 80 over a ~0.5%
base rate): well-ranked but mis-scaled. After
calibration, val Brier dropped 0.187 →
0.006 and the mean prediction matches the
empirical base rate. The ordering of frames is
preserved end-to-end; only the absolute scale changes.
It no longer sits flat. An earlier draft showed P pinned at exactly 3.02% the whole chain, an artifact of the old isotonic step-function calibration pooling the high-confidence raw band into one bin. We switched to a smooth Beta curve (same val Brier), so the displayed probability now climbs 3.7 → 4.6% across the recycle as the model gets steadily more sure. Full story in the "why P used to look dead-flat" box under the on-ball table. Higher-danger plays (e.g. Janssen's point-blank near-miss) calibrate to ~7%.
Q3. If event JOI isn't tracking-based, how does event data capture location?
A correction from an earlier framing: PFF's event records actually do include positional snapshots of all 22 players + ball at every event moment. So "event data has no positions" was wrong. The real gap is sample density.
Verified directly on this match (Argentina v Australia, match 10503):
| Source | positional snapshots | when |
|---|---|---|
| PFF event data | 2,380 | only at recorded events (passes, shots, tackles, …) |
| PFF tracking data | 179,620 | every frame at 30 fps, the whole match |
| → 75× more samples in tracking | ||
So the distinction is:
- Event JOI samples positions only when an on-ball event fires, roughly 1–3 per second of active play. Between events: blind.
- AW-JOI samples positions at every frame, so it sees the runs, drifts, and re-shapes that happen between touches. On this 13.6-second clip that's 69 frames vs maybe 8 event records. The off-ball signal lives in the in-between ~60 frames event JOI doesn't see.
So the real off-ball gap isn't "event data lacks positions"; PFF has them. It's that event-based VAEP/JOI only weights the snapshots at events, never crediting players for what they were doing during the silent frames between touches.
Footnote on the original paper. Bransen & Van Haaren (2020) did not use tracking data. Their JOI / JDI runs on SPADL events, which carry the (x, y) of the ball / actor at the moment of an event, not the 22-player snapshot. Modern providers (PFF here) ship snapshots alongside events for free, which is why our "event JOI" baseline can still show the receiver's location, but the metric itself is defined the original way: it only updates at event moments. Our AW-JOI is the extension that uses the full continuous 22-player tracking signal.
Q4. Are there timestamps on the off-ball pairs so I can sync with the video?
Yes. The "Co-attended window" column shows each
pair's window as seconds before the goal,
so the ball crossing the line is the zero point. The
Otamendi recycle pairs all read 11.8 → 2.0 s
before goal: the model picks them up the instant
Argentina recover (~11.8 s out) and holds them right up
to ~2 s before the strike, when attention collapses
onto Messi. Hit the ⚽ goal
button in the play and step backwards to land on any row.
In the broadcast clip at the top of this page (looped),
that window is the stretch from Argentina recovering the
ball to Messi finishing.
What this says about the offensive structure. In AW-JOI terms, Argentina's "Messi goal" play is an Otamendi-led recycle that spreads credit across his partners, not a one-pair story. The two pairs that also show up as on-ball passes (Otamendi ↔ Mac Allister, Otamendi ↔ Messi) sit in the pass table above; the four off-ball-only pairs here earned their credit entirely between the touches, while the model attended to one structural relationship after another as Argentina worked the ball out. The "ball-side puller" (Otamendi) sits at the hub of all of them, while Fernández peels the opposite way to drag a defender. Without those off-ball relationships sustaining and stretching the shape, the ball never gets to Otamendi to feed Messi. Event data can't see any of it; the recycling passes have event-JOI of zero because the model was already confident the goal was coming. AW-JOI is what lets you see where the structural work was happening off the ball, frame by frame.
Method & sources
TCD (Team Chemistry Density) is the count of same-squad pairs with attention-weighted JOI per 90 above the strong-pair threshold, the same metric and threshold used on the Chemistry Leaderboard. tcd_def is the subset of TCD where both players are defenders (CB/LB/RB/LWB/RWB/GK). AW-JOI itself is the per-frame product of the two players' ball-attention multiplied by max(ΔPscore, 0), accumulated across the tournament. See methodology §AW-JOI for the full pipeline.
Tournament result rank: winner=1, RU=2, 3rd=3, 4th=4, QF losers ranked 5–8 by group-stage points, R16 losers 9–16, group-stage exits 17–32 by points then goal diff. Standard FIFA tournament ranking.
Interactive plays: frame-by-frame inference from the Frame-VAEP transformer. We run two separate specialist models per frame, one for P(score next 10s) and one for P(concede next 10s). The attention source toggle picks between the score specialist (single-head, attention biased toward attackers/receivers) and the shared two-head model.
Bottom line. Chemistry wins. Argentina (nucleus), France (network), Morocco (wall), Croatia (engine) all built different shapes, and AW-JOI + AW-JDI sees every one of them, including the defensive pinning that the published Morocco paper explicitly says event data cannot measure. That gap is the value of frame-level chemistry. The France, Morocco and Croatia case studies, and the full play-by-play gallery, are on Interactive Plays.